10x12 Shed Plans
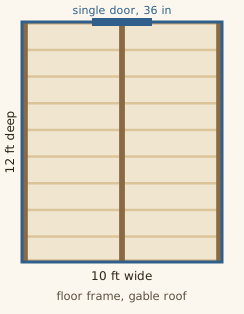
A 10x12 ft shed is 120 sq ft on a skid floor, one of the most searched shed sizes and large enough for a small workshop or ride-on mower storage. Front and back walls run 120 in (10 ft); the 12 ft ridge board runs exactly 144 in, the longest length that still fits a single 12 ft board with no splice.
This size is gable roof only: at 12 ft of depth, a lean-to rafter would need to run past a 12 ft stock length, so the engine does not offer a lean-to option here. Each gable rafter runs 73.1 in including overhang, cut from an 8 ft board.
Three floor skids run the full 12 ft depth with joists on 16 in centers between them. Available with a single or double door.
Need a lean-to roof instead? See the lean-to shed plans page for the sizes that support it, or preview this exact 10x12 gable build with the free Shed Material Calculator.
What fits in 120 square feet
This is the size most people actually want once they have owned a smaller shed. A 10 ft bench along the back wall, a mower and a wheelbarrow parked on one side, wall storage on the other, and still a clear path to the door. It is also the first size where a ride-on mower fits with room to get around it rather than just room to park it.
What goes under it
Every plan here frames the floor on pressure treated skids, which means the shed can sit on a compacted gravel pad rather than a poured slab. The usual build is 4 in of compacted crushed stone extending about 12 in past the footprint on every side, levelled across the diagonals before the first skid goes down. Solid concrete blocks under the skids at regular intervals keep the timber off standing water. Get this stage level and square and the walls go up without fighting; get it wrong and every later cut fights the error.
Working inside it
At 120 sq ft, two details pay for themselves: a window or a translucent panel on the wall opposite the door, because a shed lit only through its doorway is a shed you work in with the door open in the rain, and a pair of soffit vents with a ridge or gable vent, which keeps summer heat and condensation from turning stored tools rusty.
Check before you order lumber
Two local rules decide whether a size is buildable where you are, and neither is in any plan: the floor area above which your jurisdiction requires a building permit, commonly in the 100 to 200 sq ft range but set locally, and the setback distance from property lines and other structures. Both are answered by a phone call to the building department, and both are cheaper to answer before the timber is on the driveway than after the neighbour asks.
Build order that keeps a 10x12 frame square
Start by marking a pad that is about 12 ft by 14 ft, so the stone extends past the shed on all sides. Set two string lines at right angles, then check the diagonals. For a true 10 ft by 12 ft rectangle, the diagonal is 187.5 in. If both diagonals match within 1/4 in, the layout is square enough for framing.
Place the skids first, then block and level them before any joists are cut. Sight along each skid and use a 4 ft level across the three skids. A 1/4 in dip under the middle skid will show up later as a floor hump or a wall plate gap. Shim with solid concrete or treated blocking, not loose scraps that can move.
Frame the floor as a full platform, square it again, then fasten the sheathing before raising walls. The floor sheathing locks the rectangle better than temporary braces alone. Snap chalk lines for wall plates on the deck so the walls land straight and do not drift at the corners.
Build the long walls flat on the platform, raise them, brace them plumb, then build and raise the gable end walls. Set the ridge only after both gable walls are braced. Cut one rafter pair first and test it at the ridge and wall plates before cutting the rest. This avoids repeating a wrong seat cut across the full roof.
Tools, working space and control dimensions
A 10x12 shed is still small enough for two people to build, but the wall panels and roof sheets are awkward alone. Plan for one full weekend for the floor and walls, and another one to dry in the roof if cuts are prepared and the pad is already finished.
| Item to check | Target figure | Why it matters |
|---|---|---|
| Foundation diagonal | 187.5 in for a 10 ft by 12 ft rectangle | Confirms the pad and skid layout are square. |
| Extra pad size | About 12 ft by 14 ft | Gives about 12 in of drainage stone around the shed. |
| Level tolerance | Within 1/4 in across the skid tops | Keeps walls from rocking and doors from binding. |
| Temporary bracing | One diagonal brace per wall until roof sheathing is fixed | Stops tall walls from leaning during assembly. |
| Clear work area | At least 3 ft on each side, 6 ft at the door wall | Allows sheet handling, ladder placement and door fitting. |
Useful equipment includes a circular saw, drill or impact driver, hammer, chalk line, framing square, speed square, 25 ft tape, 4 ft level, ladder, clamps and sawhorses. A string line is often more useful than a short level for checking skid straightness over 12 ft. Keep a pencil mark system for studs, joists and rafters, because reversed marks are a common source of layout errors.
Frequent mistakes and practical recovery
- If the floor is out of square by less than 1/2 in, pull the long diagonal shorter with a ratchet strap before fastening the last sheets. If it is more than 1/2 in out, loosen the rim and correct the frame before continuing.
- If one skid sits low, lift only that skid line and add solid support under it. Do not try to hide the error by forcing the joists down with fasteners.
- If a wall is framed slightly long, trim the plate end before standing it. Do not let the corner overhang the floor, because siding and corner trim will follow the mistake.
- If a rafter test piece leaves a gap at the ridge, correct the pattern before cutting more. A 1/8 in error at one cut becomes visible when repeated across the roof.
- If the door opening is not plumb, brace the wall square before sheathing it. Once the wall covering is fixed, the opening is much harder to move.
Most recovery work is easier before sheathing. Treat the first sheet on each surface as a square gauge. Align it carefully, fasten a few corners, then check the frame before driving all fasteners. This habit adds minutes and can save hours of rework.
Special cases to plan before cutting
If the shed will hold a ride-on mower, keep the route from the door to the parking area clear of bench legs, stored lumber and wall hooks. A mower needs turning space as well as floor space, so mark its real footprint on the deck with tape before fixing interior framing or shelves.
If the site slopes more than about 6 in over the shed depth, do not stack loose blocks high under one end. Cut into the high side, build up the low side with compacted stone, or use a properly supported pier layout that local rules allow. Tall, unbraced support stacks shift under seasonal movement.
If you need to change door position, window position or wall height, check the full cut list again before buying lumber. Moving an opening changes stud counts, header location, siding joints and trim lengths. For other layouts, compare the base options on shed plans, and check rule questions on the FAQ before you frame.
Read next
- About Shed Cut List: Shed Cut List is built and run by WEABLE SAS.
- 10x10 Shed Plans: 10x10 ft shed plans, 100 sq ft on a skid floor, gable or lean-to roof, single or double door.
- 8x10 Shed Plans: 8x10 ft shed plans, 80 sq ft on a skid floor, gable or lean-to roof, single or double door.